AmazonSNS通知の内容を電話で通知する
Twilioという電話通知を行えるAPIサービスを使用して、
SNS通知 -> Lambda -> Twilio -> 携帯電話
という流れで電話通知を行う仕組みを作ってみます。
使用するサービス
Twilioのアカウントを作成する
- サインアップからアカウントを作成します。
- アカウントを作成したらこちらでTwilioの電話番号を取得します。
Show API CredentialsをクリックしAccountSidとAuthTokenをメモします。
Lambdaアプリの作成
アプリはこちらからダウンロードします。 gitとnpmを使用しますので入ってない場合はインストールしてください。
git clone https://github.com/y-matsuki/sns-phone-call.git
cd sns-phone-call/
設定ファイルconfig/default.yamlを編集します。
twilio:
  accountSid: 'ACxxxxxxxxxxxxxxxxxxxxxxxxxxxxxxxx'
  authToken: 'xxxxxxxxxxxxxxxxxxxxxxxxxxxxxxxx'
  language: 'ja-jp'
  voice: 'woman'
  toNumber: '+81xxxxxxxxxx'
  fromNumber: '+81xxxxxxxxx'
accountSid,authTokenは先ほどメモした値を設定します。fromNumberには先ほど取得したTwilioの電話番号を設定します。toNumberには認証済みの電話番号(アカウント登録時の電話番号)を設定します。
設定ファイルを修正したら以下のコマンドでzipパッケージを作成します。
npm install
npm run build
SnsPhoneCall.zipが出来たら成功です。
Lambdaアプリのデプロイ
AWS Management ConsoleにログインしAWS Lambdaのページへ移動します。 現在(2015/6)はまだ東京リージョンに作成できませんが夏には来るそうです。
| 項目名 | 設定値 |
|---|---|
| Name | sns-phone-call(任意) |
| Runtime | NodeJS |
| Code entry type | Upload a .ZIP file |
| Handler | SnsPhoneCall.handler |
| Role | Basic execution role |
Uploadボタンから先ほど作成したSnsPhoneCall.zipをアップロードして、
Create Lambda Functionボタンをクリックします。
SNS通知の作成
Amazon SNSのページへ移動してCreate new topicからトピックを作成します。
作成したらActions > Suscribe to topicから配信先を登録します。
ProtocolにAWS Lambdaを選択すると先ほど作成したLambdaアプリが表示されます。
Create Subscriptionをクリックしたら準備完了です。
動作確認
先ほど作成したSNSトピックを選択しPublish to toipcをクリックします。
Messageに喋らせたい内容を記述してPublish messageをクリックします。
設定ファイルのtoNumberに設定した電話番号宛に電話が届いたら成功です。
まとめ
Lambdaを使用することでEC2なしでTwilioAPIをコールする仕組みができました。 Lambdaアプリの処理はnode.jsで記述しているためSNS通知の内容を読んで キーワードでフィルタしたり宛先を振り分けたりカスタマイズすると面白いかなと思います。
Google Java Style + Gradle checkstyle plugin
こちらからgoogle_checks.xmlをダウンロードして${project.projectDir}/config/checkstyle/checkstyle.xmlに置きます。
サブプロジェクトを使用する場合など設定ファイルの場所を変えたい場合は、
以下のようにbuild.gradleファイルに指定します。
checkstyleMain.configFile = file("${rootProject.projectDir}/config/checkstyle/checkstyle.xml")
チェックしたいプロジェクトのbuild.gradleにcheckstyleプラグインを追加しますが、
apply plugin: 'checkstyle'
このままでは以下のようなエラーが出ました。
:common-utils:checkstyleMain FAILED

FAILURE: Build failed with an exception.

* What went wrong:
Execution failed for task ':common-utils:checkstyleMain'.
> Unable to create a Checker: Property 'fileExtensions' in module Checker does not exist, please check the documentation

* Try:
Run with --stacktrace option to get the stack trace. Run with --info or --debug option to get more log output.

BUILD FAILED

Total time: 10.012 secs
Property 'fileExtensions' in module Checker does not exist, please check the documentation
18:13:19: External task execution finished 'checkstyleMain'.
checkstyleを実行する際のライブラリcom.puppycrawl.tools:checkstyleのバージョンが
XMLとあっていないのが原因だったようで、
以下の設定を追加したら正常に実行することができました。
apply plugin: 'checkstyle'
checkstyle.toolVersion = '6.6
最新のcheckstyle.xmlファイルを利用する場合はtoolVersionも最新のものを利用するのが良いようです。
最新版は"Maven Repository: com.puppycrawl.tools » checkstyle"で確認できます。
参考
java - Error using checkstyle/google_checks.xml with maven-checkstyle-plugin - Stack Overflow
dockerでローカル環境にデータベースを立ち上げる
ずいぶん前に触ってからイマイチ使いどころが分からなかったdockerですが、
ECS (EC2 Container Service)も出たことなので思い出しついでのメモ。
boot2docker
ローカル環境はboot2docker一択でしょうか。Windows版もあるみたいです。
Mac版で試します。brew installで簡単に。
$ brew install boot2docker
$ boot2docker init
$ boot2docker up
boot2docker init実行時に出力された値を環境変数に設定する必要があるので、
~/.bash_profileにでも貼り付けておきます。
$ vi ~/.bash_profile
(〜省略〜)
export DOCKER_HOST=tcp://192.168.xxx.xxx:2376
export DOCKER_CERT_PATH=/Users/yustam/.boot2docker/certs/boot2docker-vm
export DOCKER_TLS_VERIFY=1
$ source ~/.bash_profile
PostgreSQL
DockerHubよりPostgreSQLのイメージを起動。
$ docker run -it -e POSTGRES_PASSWORD=hogehoge -p 5432:5432 postgres
接続先はboot2docker ipで取得した値のようです。
$ boot2docker ip
192.168.xxx.xxx
$ psql -h 192.168.xxx.xxx -U postgres
Password for user postgres: hogehoge
psql (9.4.1)
Type "help" for help.

postgres=#
MongoDB
こちらも同じように書けます。DockerHubからMongoDBを起動。
$ docker run -it -p 27017:27017 mongo
$ mongo 192.168.xxx.xxx
MongoDB shell version: 3.0.2
connecting to: 192.168.xxx.xxx/test
> show dbs;
local  0.078GB
>
その他調べたこと
- この起動方法だと停止するとデータも消える(使い捨てテスト用?)
docker runのオプション
| 省略形 | オプション | 意味 |
|---|---|---|
| -e | --env | コンテナの環境変数に値をセットする |
| -p | --publish | コンテナの外から接続するためにポートを公開する |
| -i | --interactive | 標準入力の有効化。Ctrl+Cで停止できるようになる |
| -t | --tty | 擬似コンソール?。-iと組み合わせて対話的に動作する |
| -d | --detach | コンテナをバックグラウンドで動作させる |
他のアカウントへS3バケットへのアクセスを許可する
クロスアカウントと外部ID
このあたりに書いてあることを実践してみます。
外部 ID について - AWS Security Token Service
一時的なセキュリティ認証情報を使用して AWS リソースをリクエストする - AWS Security Token Service
準備
アクセス元のアカウントIDを調べます。
ここではアクセス元を999999999999としS3バケットがある方を111111111111とします。
S3バケットを持つアカウントの方にIAMにロールを作成
- ロール名を入力
ここではcross-accountとしました。
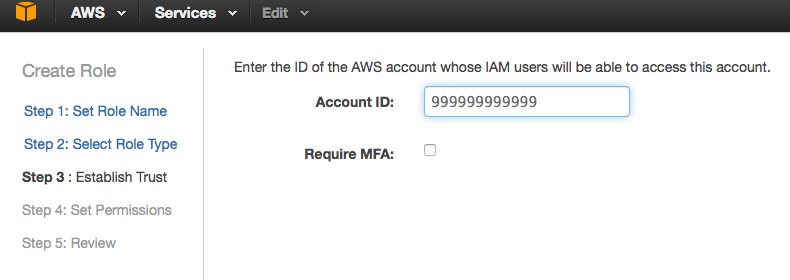
- アクセス元のアカウントIDを入力

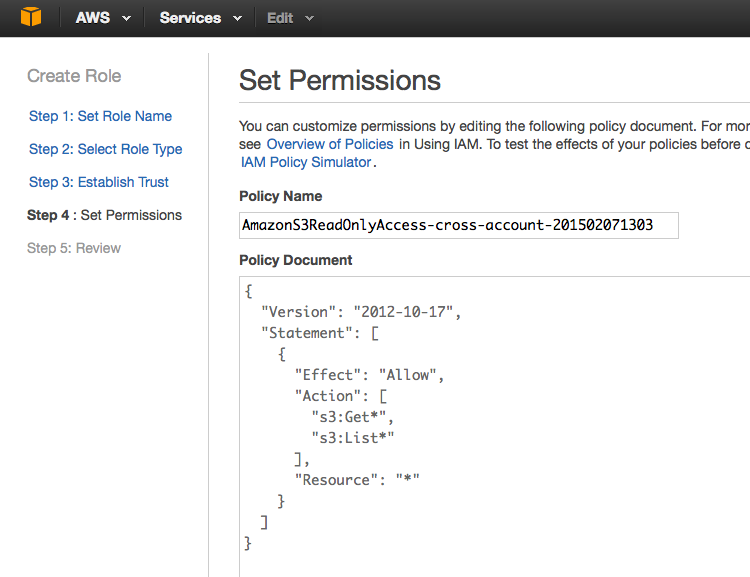
- ポリシーを選択

ここではSelectPolicyTemplateからAmazon S3 Read Only Accessを選択し、
そのまま進んでロールを作成しました。
アクセス元のアカウントからアクセスしてみる
- アクセス元のアカウントにEC2を立ててそこからアクセスしてみます。
sshログインしたら試しにS3のバケット一覧を取得してみます。
$ ssh ec2-user@ec2-54-65-xxx-xxx.ap-northeast-1.compute.amazonaws.com -i key.pem
[ec2-user@ip-172-31-24-163 ~]$ aws s3 ls
2014-12-23 07:25:37 cf-templates-xxxxxxxxxxxxx-ap-northeast-1
2015-01-11 03:32:18 elasticbeanstalk-ap-northeast-1-999999999999
2015-01-05 14:42:54 yustam-artifact-repository
2014-11-07 15:21:07 yustam-docker-registry
2014-12-11 09:52:14 yustam-lambda-sample
2014-11-14 12:26:45 yustam-private
ロールを付与しておくとここではアクセス元アカウントのバケットが確認できます。
- STSのAssumeRoleでセッションを作成
ここではaws-cliを使用してクロスアカウントアクセスを利用します。
sts assume-roleを使用してS3バケットアクセス用のセッションを作成します。
[ec2-user@ip-172-31-24-163 ~]$ aws sts assume-role --role-arn arn:aws:iam::111111111111:role/cross-account --role-session-name hoge
{
    "AssumedRoleUser": {
        "AssumedRoleId": "AROAJWSTZ4KKB2EXAMPLE:hoge",
        "Arn": "arn:aws:sts::111111111111:assumed-role/cross-account/hoge"
    },
    "Credentials": {
        "SecretAccessKey": "EmlBUyGcOKPI/Sdsf4RCE56sHnbo6XfJkEXAMPLE",
        "SessionToken": "AQoDYXdzECUagAKpFP2OknLKXsPLl/801n...(省略)",
        "Expiration": "2015-02-07T05:19:53Z",
        "AccessKeyId": "ASIAJ2GNOUN4ZEXAMPLE"
    }
}
- 作成したセッションを利用してS3バケットにアクセスしてみる
先ほどのレスポンスに記載されたアクセスキー/シークレットキー/トークンを使用します。
[ec2-user@ip-172-31-24-163 ~]$ export AWS_ACCESS_KEY_ID=ASIAJ2GNOUN4ZEXAMPLE
[ec2-user@ip-172-31-24-163 ~]$ export AWS_SECRET_ACCESS_KEY=EmlBUyGcOKPI/Sdsf4RCE56sHnbo6XfJkEXAMPLE
[ec2-user@ip-172-31-24-163 ~]$ export AWS_SECURITY_TOKEN=AQoDYXdzECUagAKpFP2OknLKXsPLl/801n...(省略)
[ec2-user@ip-172-31-24-163 ~]$ aws s3 ls
2013-02-15 08:04:27 private.yustam.jp
2013-01-21 05:53:07 www.robotjohn.jp
2013-07-10 01:08:47 www.yustam.jp
2013-10-27 02:28:07 yustam.convert
S3バケットの一覧を取得するとアクセス先アカウントのバケット一覧が取得できます。
Javaから利用する場合は以下のようにAssumeRoleしてcom.amazonaws.auth.BasicSessionCredentialsを作成すればいいみたいです。
package jp.yustam.s3.ca;

import com.amazonaws.auth.AWSCredentials;
import com.amazonaws.auth.BasicSessionCredentials;
import com.amazonaws.services.s3.AmazonS3;
import com.amazonaws.services.s3.AmazonS3Client;
import com.amazonaws.services.s3.model.Bucket;
import com.amazonaws.services.securitytoken.AWSSecurityTokenService;
import com.amazonaws.services.securitytoken.AWSSecurityTokenServiceClient;
import com.amazonaws.services.securitytoken.model.AssumeRoleRequest;
import com.amazonaws.services.securitytoken.model.AssumeRoleResult;
import com.amazonaws.services.securitytoken.model.Credentials;
import org.junit.Test;

public class CrossAccountTest {

  static final String ROLE_ARN = "arn:aws:iam::111111111111:role/cross-account";
  static final String ROLE_SESSION_NAME = "hoge";

  @Test
  public void testAccessS3BucketOnAnotherAccount() {
    AWSSecurityTokenService sts = new AWSSecurityTokenServiceClient();
    AssumeRoleResult result = sts.assumeRole(new AssumeRoleRequest()
        .withRoleArn(ROLE_ARN)
        .withRoleSessionName(ROLE_SESSION_NAME));

    Credentials credentials = result.getCredentials();
    AWSCredentials sessionCredentials
        = new BasicSessionCredentials(credentials.getAccessKeyId(),
        credentials.getSecretAccessKey(),
        credentials.getSessionToken());
    AmazonS3 s3 = new AmazonS3Client(sessionCredentials);
    for (Bucket bucket : s3.listBuckets()) {
      System.out.println(bucket);
    }
  }

}
Javaからもっと簡単に使う(3/5更新)
Credentialsを毎回生成するのもイケてないし有効期限があるから管理めんどうだなと
思ってたらSTSAssumeRoleSessionCredentialsProviderという便利なものが既に用意されていた。
AWSCredentialsProvider cp
    = new STSAssumeRoleSessionCredentialsProvider(ROLE_ARN, ROLE_SESSION_NAME);
AmazonS3 s3 = new AmazonS3Client(cp);
re:Invent 2014スライドのメモ
re:Invent 2014のスライドが少しずつ登録されているようなので気になるものをメモ。
サービス別
Amazon Key Management Service
(SEC301) Encryption and Key Management in AWS | AWS re:Invent 2014
(SEC406) NEW LAUNCH: Building Secure Applications with AWS Key Manage…
Amazon Aurora
(SDD415) NEW LAUNCH: Amazon Aurora: Amazon’s New Relational Database …
CloudFormation
(APP306) Using AWS CloudFormation for Deployment and Management at Sc…
EC2
(SDD406) Amazon EC2 Instances Deep Dive | AWS re:Invent 2014
IAM
(SEC305) IAM Best Practices | AWS re:Invent 2014
Netflix
(DEV309) From Asgard to Zuul: How Netflix’s Proven Open Source Tools …
(BDT403) Netflix's Next Generation Big Data Platform | AWS re:Invent …
Hybrid
(ARC203) Expanding Your Data Center with Hybrid Infrastructure | AWS …
(ENT401) Hybrid Infrastructure Integration | AWS re:Invent 2014
その他
(DEV302) Tips, Tricks, and Best Practices for the AWS SDK for Java | …
(BAC304) Deploying a Disaster Recovery Site on AWS: Minimal Cost with…
(ARC306) IoT: Small Things and the Cloud | AWS re:Invent 2014
(ARC307) Infrastructure as Code | AWS re:Invent 2014
(SDD409) Amazon RDS for PostgreSQL Deep Dive | AWS re:Invent 2014
整理中...
(SDD408) Amazon Route 53 Deep Dive: Delivering Resiliency, Minimizing…
(PFC403) Maximizing Amazon S3 Performance | AWS re:Invent 2014
(PFC402) Bigger, Faster: Performance Tips for High Speed and High Vol…
(PFC306) Performance Tuning Amazon EC2 Instances | AWS re:Invent 2014
(PFC303) Milliseconds Matter: Design, Deploy, and Operate Your Applic…
(MED303) Secure Media Streaming and Delivery | AWS re:Invent 2014
(MBL202) NEW LAUNCH: Getting Started with AWS Lambda | AWS re:Invent …
(DEV308) Automating Your Software Delivery Pipeline | AWS re:Invent 2…
(ARC318) Continuous Delivery at a Rate of 500 Deployments a Day! | AW…
(ARC402) Deployment Automation: From Developers' Keyboards to End Use…
(ARC311) Extreme Availability for Mission-Critical Applications | AWS…
(ARC304) Designing for SaaS: Next-Generation Software Delivery Models…
(APP310) Scheduling Using Apache Mesos in the Cloud | AWS re:Invent 2…
(ARC203) Expanding Your Data Center with Hybrid Infrastructure | AWS …
(APP313) NEW LAUNCH: Amazon EC2 Container Service in Action | AWS re:…
(APP303) Lightning Fast Deploys with Docker Containers and AWS | AWS …
(APP308) Chef on AWS: Deep Dive | AWS re:Invent 2014
(SPOT303) Building Mission Critical Database Applications: A Conversa…
(WEB301) Operational Web Log Analysis | AWS re:Invent 2014
Enterprise Security Considerations
[(ARC311) Extreme Availability for Mission-Critical Applications | AWS…
(APP204) NEW LAUNCH: Introduction to AWS Service Catalog | AWS re:Inv…
(APP304) AWS CloudFormation Best Practices | AWS re:Invent 2014
(APP307) Leverage the Cloud with a Blue/Green Deployment Architecture…
(ARC312) Processing Money in the Cloud | AWS re:Invent 2014
(ARC202) Real-World Real-Time Analytics | AWS re:Invent 2014
(ENT209) Netflix Cloud Migration, DevOps and Distributed Systems | AW…
(SDD407) Amazon DynamoDB: Data Modeling and Scaling Best Practices | …
(SDD405) Amazon Kinesis Deep Dive | AWS re:Invent 2014
(SDD401) Amazon Elastic MapReduce Deep Dive and Best Practices | AWS …
(SDD424) Simplifying Scalable Distributed Applications Using DynamoDB…
(SDD416) Amazon EBS Deep Dive | AWS re:Invent 2014
(SDD413) Amazon S3 Deep Dive and Best Practices | AWS re:Invent 2014
(SPOT305) Event-Driven Computing on Change Logs in AWS | AWS re:Inven…
(SDD418) Amazon CloudWatch Deep Dive | AWS re:Invent 2014
(SDD423) Elastic Load Balancing Deep Dive and Best Practices | AWS re…
CloudFormationのテンプレートをVelocityで生成する
CloudFormationのテンプレートは変数を定義したり他のコンポーネントを参照させたり結構いろいろなことが出来ますが汎用的に書こうとすると複雑になってしまい慣れてない人だと読みづらいテンプレートになってしまうため、 テンプレートのテンプレートを作成してApache VelocityでAMIやスナップショットIDなど
注入する方がメンテナンスも楽かなと思い試してみました。
要するにMappingsとParametersを使用せずにVelocityのテンプレートを書いてJavaから変数を渡します。
Velocityに限らずのテンプレートエンジンだとコメントも書き放題なのでメンテナンスを考えると何かしらテンプレートエンジンを使用する方がいい気がします。
他にCloudFormationのテンプレートに向いているテンプレートエンジンがあれば教えて欲しいです。
テンプレート
セキュリティグループにEC2インスタンス×1+EBSボリューム×1(ファイル用)+EBSボリューム×N(DB用)みたいな簡単な構成です。
velocity-cfn-template-sample.template.vm
Javaコード
VelocityContext context = new VelocityContext();
context.put("description", new String("this is my sample template."));
context.put("availability_zone", new String("ap-notrheast-1"));
context.put("instance", new Instance("ami-00000000", "SampleInstance", "t2.micro"));
context.put("volume", new Snapshot(null, "File", "standard", "/dev/sdf", "/mnt/file", 10));

List<Ingress> ingress = new ArrayList<>();
ingress.add(new Ingress("tcp", 22, 22, "XXX.XXX.XXX.XXX"));
ingress.add(new Ingress("tcp", 5432, 5432, "XXX.XXX.XXX.XXX"));
context.put("security_group", new SecurityGroup("SampleSG", "this is a sample.", ingress));

List<Snapshot> snapshots = new ArrayList<>();
snapshots.add(new Snapshot("snap-00000001", "DB01", "standard", "/dev/sdh", "/var/lib/pgsql9/data1", 10));
snapshots.add(new Snapshot("snap-00000002", "DB02", "standard", "/dev/sdi", "/var/lib/pgsql9/data2", 10));
snapshots.add(new Snapshot("snap-00000003", "DB03", "standard", "/dev/sdj", "/var/lib/pgsql9/data3", 10));
context.put("snapshots", snapshots);

Velocity.addProperty("input.encoding", "UTF-8");
Velocity.addProperty("output.encoding", "UTF-8");
Velocity.addProperty("resource.loader", "class");
Velocity.addProperty("class.resource.loader.class",
    "org.apache.velocity.runtime.resource.loader.ClasspathResourceLoader");
Velocity.init();

Template template = Velocity.getTemplate(name);

StringWriter sw = new StringWriter();
template.merge(context, sw);
System.out.println(sw.toString());
出力
PlayFramework + PostgreSQL環境構築 on AmazonLinux
PostgreSQLとScalaの勉強用に構築した際のメモ。
--
まず、AmazonLinuxを立ちあげてこちらを参考にPostgreSQLをインストール
Install PostgreSQL on AWS EC2(Amazon Linux AMI 2013.03.1) | Developers.IO
バージョン確認。9.2.7がインストールされました。
-bash-4.1$ psql -version
psql (9.2.7)
Type "help" for help.

postgres=#
次に、PlayFrameworkのインストール。こちらを参考に2.2.3をインストールしました。
Installing
--
play new <name>でアプリケーションを作成して。
ec2-user$ mkdir ~/workspace && cd ~/workspace
ec2-user$ play new hello-play
動作確認をしたらPostgreSQLと接続する準備。ライブラリを依存関係に追加。 /home/ec2-user/workspace/hello-play/conf/build.sbt
name := "hello-play"

version := "1.0-SNAPSHOT"

libraryDependencies ++= Seq(
  jdbc,
  anorm,
  cache,
  "org.postgresql" % "postgresql" % "9.2-1004-jdbc41"
)

play.Project.playScalaSettings
/home/ec2-user/workspace/hello-play/conf/application.conf
db.default.driver=org.postgresql.Driver
db.default.url="jdbc:postgresql://127.0.0.1:5432/book"
db.default.user=postgres
db.default.password="password"
--
再起動すると以下のエラーが発生。DBの認証に失敗しているよう。
play.api.Configuration$$anon$1: Configuration error[Cannot connect to database [default]]
        at play.api.Configuration$.play$api$Configuration$$configError(Configuration.scala:92) ~[play_2.10.jar:2.2.3]
        at play.api.Configuration.reportError(Configuration.scala:570) ~[play_2.10.jar:2.2.3]
        at play.api.db.BoneCPPlugin$$anonfun$onStart$1.apply(DB.scala:252) ~[play-jdbc_2.10.jar:2.2.3]
        at play.api.db.BoneCPPlugin$$anonfun$onStart$1.apply(DB.scala:243) ~[play-jdbc_2.10.jar:2.2.3]
        at scala.collection.TraversableLike$$anonfun$map$1.apply(TraversableLike.scala:244) ~[scala-library.jar:na]
        at scala.collection.TraversableLike$$anonfun$map$1.apply(TraversableLike.scala:244) ~[scala-library.jar:na]
Caused by: org.postgresql.util.PSQLException: FATAL: password authentication failed for user "postgres"
        at org.postgresql.core.v3.ConnectionFactoryImpl.doAuthentication(ConnectionFactoryImpl.java:398) ~[postgresql-9.2-1004-jdbc41.jar:na]
        at org.postgresql.core.v3.ConnectionFactoryImpl.openConnectionImpl(ConnectionFactoryImpl.java:173) ~[postgresql-9.2-1004-jdbc41.jar:na]
        at org.postgresql.core.ConnectionFactory.openConnection(ConnectionFactory.java:64) ~[postgresql-9.2-1004-jdbc41.jar:na]
        at org.postgresql.jdbc2.AbstractJdbc2Connection.<init>(AbstractJdbc2Connection.java:136) ~[postgresql-9.2-1004-jdbc41.jar:na]
        at org.postgresql.jdbc3.AbstractJdbc3Connection.<init>(AbstractJdbc3Connection.java:29) ~[postgresql-9.2-1004-jdbc41.jar:na]
        at org.postgresql.jdbc3g.AbstractJdbc3gConnection.<init>(AbstractJdbc3gConnection.java:21) ~[postgresql-9.2-1004-jdbc41.jar:na]
パスワードが設定されていなかったのでパスワードを設定。
-bash-4.1$ psql book
psql (9.2.7)
Type "help" for help.

book=# alter user postgres password 'password';
ALTER ROLE
book=# \q
-bash-4.1$
無事に動作しました。
[hello-play] $ run

--- (Running the application from SBT, auto-reloading is enabled) ---

[info] play - Listening for HTTP on /0:0:0:0:0:0:0:0:9000

(Server started, use Ctrl+D to stop and go back to the console...)

[info] play - database [default] connected at jdbc:postgresql://127.0.0.1:5432/book
[info] play - Application started (Dev)